
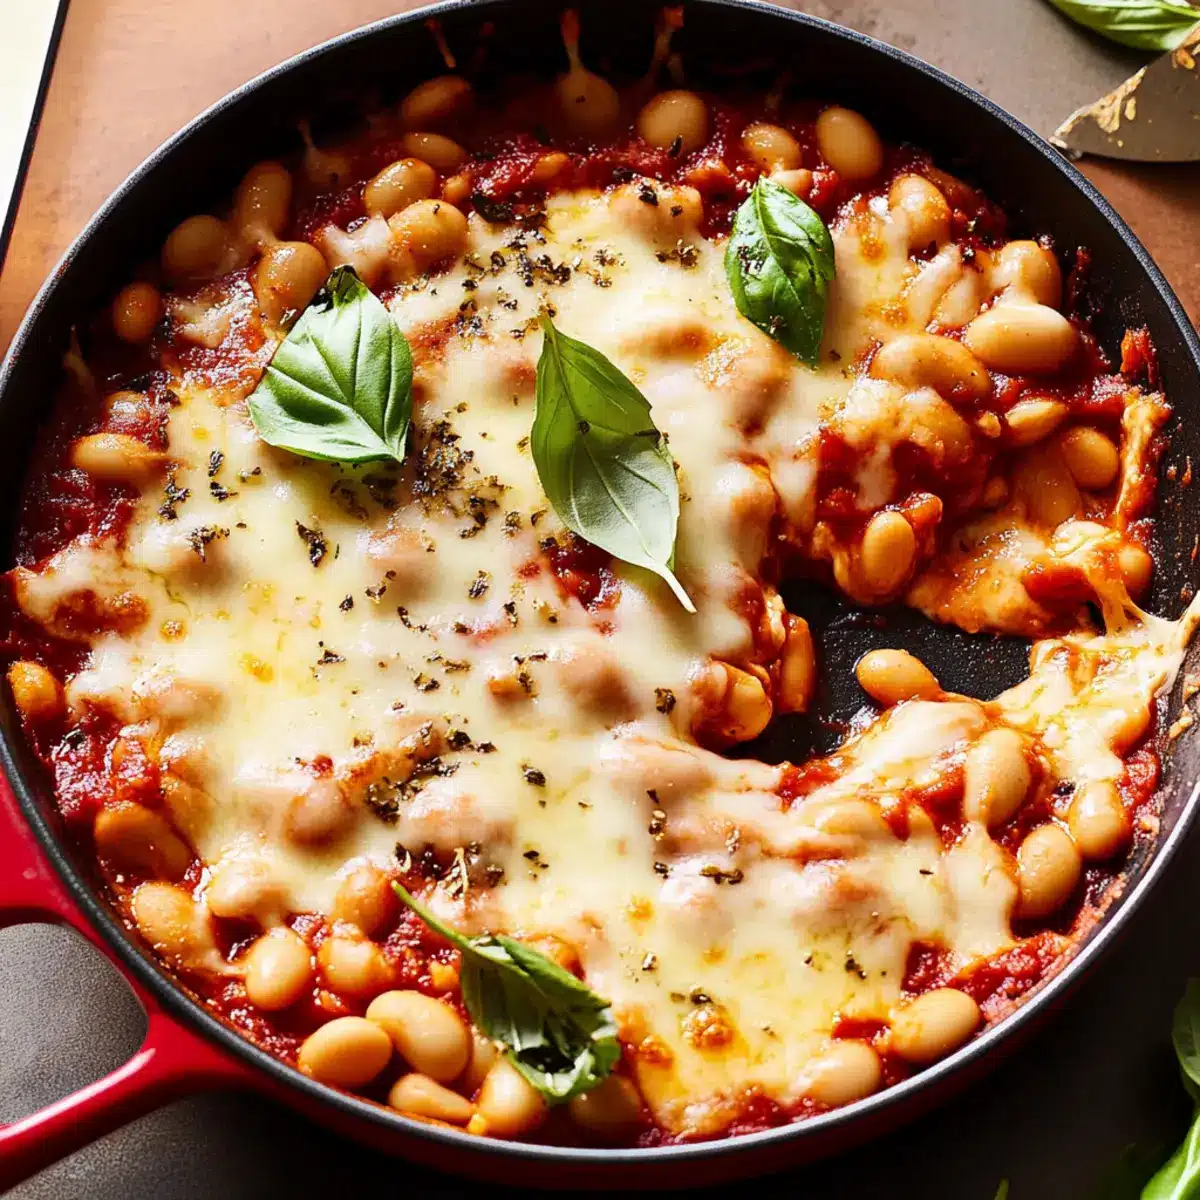
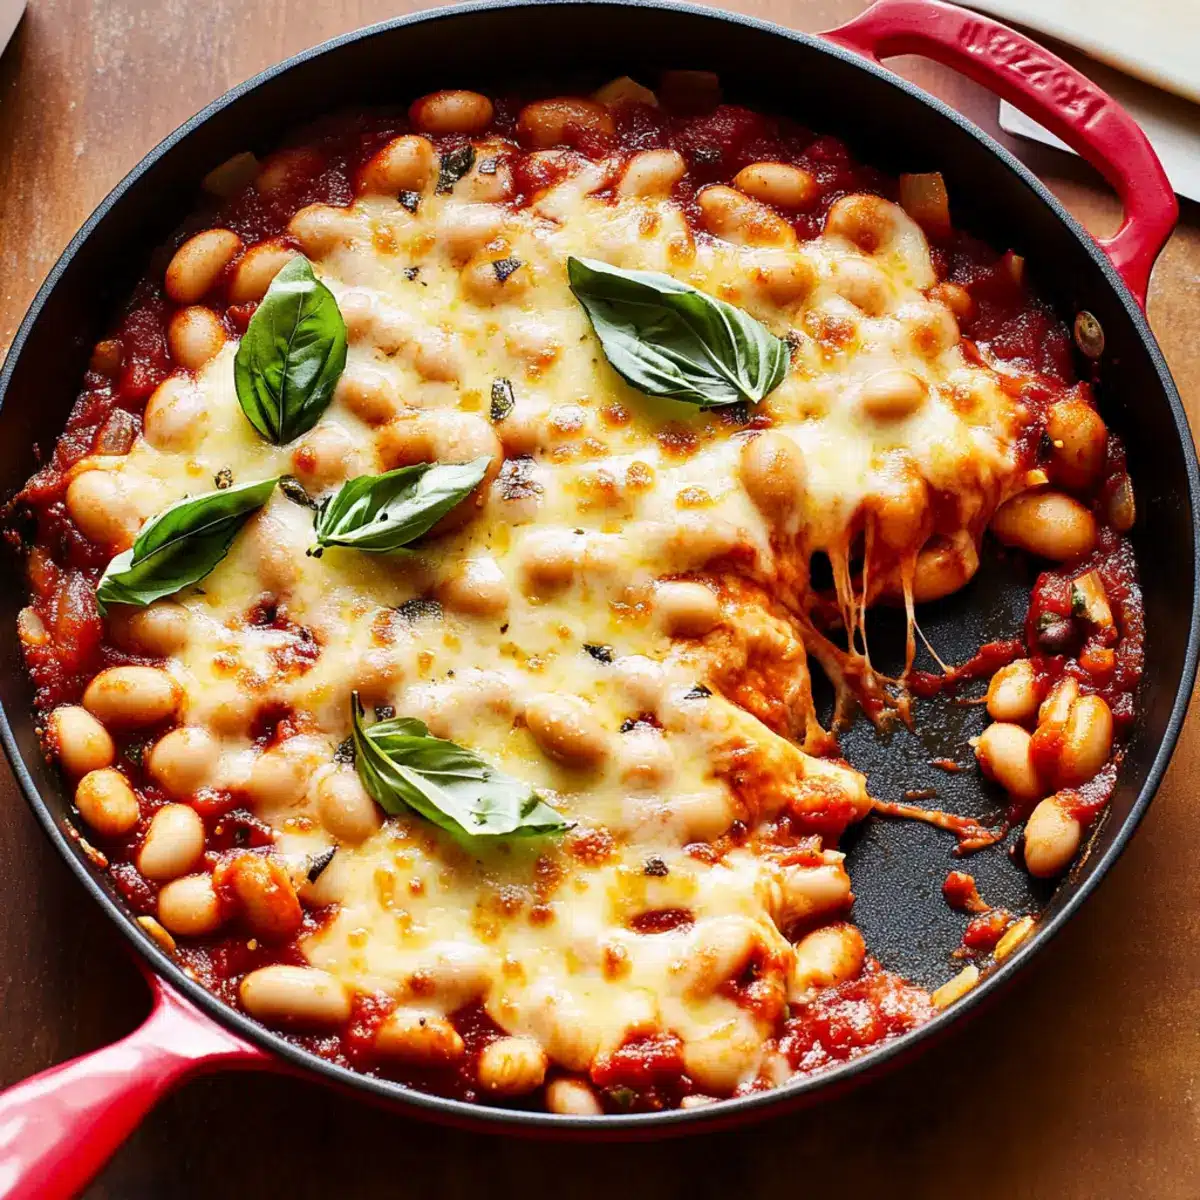
As the aroma of garlic fills the kitchen, I can’t help but feel transported to a cozy Italian bistro. If you’re like me and craving all the comforting flavors of pizza without the fuss of a traditional crust, then my One-Pan Pizza Beans recipe is about to become your new favorite weeknight dinner. This easy, vegetarian dish combines pantry staples like creamy cannellini beans and rich tomato sauce, bringing the joy of homemade pizza to your table in just under 30 minutes. Not only does it promise minimal cleanup with only one pan required, but it also allows for endless customization, making it a perfect solution for those busy nights when creativity needs a little nudge. So, are you ready to dive in and explore a delicious twist on your beloved pizza?
Why try One-Pan Pizza Beans?
Simplicity at its best: This one-pan recipe requires minimal effort, making it ideal for busy weeknights.
Flavorful and satisfying: Enjoy all the rich flavors of pizza with a delicious tomato sauce, aromatic herbs, and gooey cheese.
Versatile options: Feel free to customize with your favorite beans, vegetables, or toppings, making it a dish everyone will love.
Easy cleanup means less time in the kitchen and more time enjoying your meal. With just one pan, cleanup is a breeze!
Crowd-pleaser guaranteed: Serve hot with fresh basil on top, and watch as everyone gathers around to indulge in this comforting bowl of goodness.
Pizza Beans Ingredients
• For the Sauce
- Whole Tomatoes (28-oz. can) – Perfect for creating a flavorful base; use the whole variety for enhanced texture.
- Extra-Virgin Olive Oil – Adds rich depth to the sauce; can be substituted with any preferred cooking oil.
- Garlic (3 cloves, finely chopped) – Infuses the dish with aromatic flavor; garlic powder works as a quick substitute.
- Tomato Paste (2 tbsp) – Intensifies the tomato flavor; optional if the whole tomatoes are robust enough.
- Dried Oregano (1/2 tsp) – Delivers that quintessential herby note; fresh oregano can shine beautifully if available.
- Crushed Red Pepper Flakes (1/4 tsp) – Provides a delightful kick; adjust according to your heat preference or skip for mildness.
- Kosher Salt (1 tsp) – Elevates all flavors; sea salt can be a fantastic alternative.
- Granulated Sugar (1/2 tsp, optional) – Balances the acidity of the tomatoes; use sparingly if desired.
• For the Beans
- Cannellini Beans (2 cans, 14.5-oz., drained and rinsed) – The hearty filling packed with protein; feel free to try navy or Great Northern beans instead.
• For the Toppings
- Shredded Mozzarella (1 cup) – Melts perfectly for that cheesy goodness; cheddar or dairy-free mayo also make great swaps.
- Finely Grated Parmesan (1/4 cup) – Amplifies the flavor; if missing, consider nutritional yeast for a cheesy vibe.
- Fresh Basil Leaves – Adds freshness and color; can be replaced with other fresh herbs like parsley if needed.
Now you’re all set to create a delicious dish of Pizza Beans that’ll delight everyone at your table!
Step‑by‑Step Instructions for Beef Taquitos
Step 1: Prepare the Sofrito
In a skillet, heat 2 tablespoons of neutral oil over medium heat. Once the oil shimmers, add 1 finely chopped onion and 2 tablespoons of chopped pickled jalapeños. Sauté until the onion is soft and translucent, about 5 minutes. Next, stir in 2 cloves of finely chopped garlic and 2 tablespoons of tomato paste, cooking until the mixture is caramelized, around 3-4 minutes.
Step 2: Cook the Beef
Add 1 pound of ground beef to the sofrito in the skillet and sprinkle in 2 tablespoons of taco seasoning along with kosher salt to taste. Cook over medium-high heat, breaking up the meat with a spatula. Continue cooking for 6-8 minutes until the beef is browned and no pink remains. Remove the skillet from heat and let the mixture cool while you prepare the tortillas.
Step 3: Assemble Taquitos
In a mixing bowl, combine ½ cup of shredded cheddar cheese and ½ cup of pepper jack cheese. Prepare a thin paste with 2 tablespoons of all-purpose flour mixed into 1 tablespoon of fresh lime juice. Warm about 12 corn tortillas in the microwave for 30 seconds to keep them pliable. Fill each tortilla with a few tablespoons of the beef mixture and a sprinkle of cheese, rolling them tightly and sealing the edges with the flour paste.
Step 4: Make the Crema
In a small bowl, mix together ½ cup of sour cream, 2 tablespoons of chopped cilantro, and 1 tablespoon of lime juice. Stir until combined and smooth. Cover and place it in the refrigerator to chill while you cook the taquitos, allowing the flavors to meld together nicely.
Step 5: Cook the Taquitos
Preheat your oven to 400°F if baking or heat oil in a deep fryer to 375°F if frying. For baking, arrange the taquitos seam-side down on a lined baking sheet, brushing the tops lightly with oil. Bake for 15-20 minutes until golden brown and crispy. For frying, carefully add the taquitos in batches and cook for about 5 minutes until they’re golden and crisp. Drain them on paper towels once cooked.
Step 6: Serve
Transfer the crispy homemade beef taquitos to a serving platter. Garnish with fresh cilantro and serve them hot with the chilled crema, alongside guacamole and pico de gallo for an irresistible meal. Enjoy your flavorful Beef Taquitos while they’re still warm and crispy!
Expert Tips for Beef Taquitos
-
Warm Tortillas: Ensure your tortillas are properly warmed to prevent cracking when rolling them. This small step makes a huge difference in texture!
-
Frying in Batches: When frying, work in smaller batches to keep the oil temperature steady and achieve that perfect crispy finish without sogginess.
-
Customize Fillings: Don’t hesitate to swap out the ground beef for shredded chicken or refried beans. The beauty of beef taquitos is their versatility!
-
Seal Edges Well: Use the flour paste generously to seal the edges of your taquitos. This will prevent them from unrolling while cooking and keep all those delicious fillings inside.
-
Bake for Healthier Option: Baking the taquitos at 400°F allows for a crispy texture with less oil. Just brush them lightly with oil before baking for an extra golden touch.
-
Freezing Tips: Want to prep ahead? Assemble uncooked taquitos and freeze them on a tray before bagging. Cook directly from frozen for a quick meal later on!
What to Serve with Crispy Beef Taquitos?
Elevate your taquito experience with delightful sides that balance flavors and textures beautifully.
-
Avocado Salsa: A fresh, zesty topping that adds creaminess and tang, perfect for cooling the spice of the taquitos.
Enjoy this vibrant salsa bursting with flavor, enhancing every bite of your crispy beef taquitos. -
Refried Beans: Creamy and savory, these beans provide a hearty element that complements the crunch of the taquitos.
They’re also a fantastic source of protein, making your meal more filling and satisfying. -
Mexican Street Corn (Elote): Charred corn slathered with cheese and lime brings a sweet and savory note that pairs wonderfully.
Each bite offers a burst of flavor that contrasts delightfully with the savory beef taquitos. -
Cilantro Lime Rice: Light and fragrant, this rice dish balances the richness of the taquitos while adding a fresh twist.
It serves as a beautiful base to soak up any salsa or crema. -
Fresh Guacamole: Creamy and rich, this dip is a classic choice that adds a smooth texture and vibrancy.
Its refreshing taste enhances the savory profile of your crispy beef taquitos. -
Pico de Gallo: Bright and zesty, this fresh salsa packed with tomatoes, onions, and cilantro offers a refreshing crunch.
It’s a vibrant side that lightens up the meal, making it irresistibly delicious. -
Margaritas: Sip on a cool margarita to perfectly complement the flavors of your taquitos while adding a festive touch.
Whether frozen or on the rocks, it’s the perfect drink to enjoy with friends and family.
Beef Taquitos Variations & Substitutions
Get ready to unleash your creativity in the kitchen! These beef taquitos can easily be modified to suit your taste or dietary needs.
-
Chicken Swap: Use shredded chicken instead of ground beef for a lighter twist. It’s just as flavorful and perfectly tender!
-
Vegetarian Option: Substitute refried beans for meat to create a satisfying meatless version that’s just as delicious and hearty.
-
Cheese Choices: Experiment with different cheeses like queso blanco or goat cheese for unique flavor profiles. A touch of feta adds a delightful tang too!
-
Flour Tortillas: Feel free to swap corn tortillas for flour for a softer, chewier texture that holds up well with all the fillings.
-
Spice it Up: Mix in some cayenne pepper or chipotle seasoning to the beef for an added kick that spice lovers will adore.
-
Herb Infusion: Add fresh herbs like parsley or cilantro directly into the meat mixture for an aromatic flavor burst. A dash of smoked paprika brings warmth and depth!
-
Baked Goodness: For a healthier option, brush the taquitos with olive oil and bake them until crispy instead of frying. Just as delicious with fewer calories!
-
Creamy Alternatives: Swap sour cream with Greek yogurt for a healthier, protein-packed topping—without losing that creamy goodness.
Don’t hesitate to explore these customizable ideas to create the perfect taquitos that cater to your preferences!
How to Store and Freeze Beef Taquitos
Fridge: Store leftover cooked beef taquitos in an airtight container for up to 3 days. Reheat them in the oven to maintain their crispiness.
Freezer: Uncooked assembled beef taquitos can be frozen for up to 4 months. Place them on a tray to freeze individually, then transfer them to a zip-top bag for compact storage.
Reheating: Cook frozen beef taquitos directly from the freezer; add a few extra minutes to baking time for a perfectly crispy finish.
Cooling: Let cooked taquitos cool completely before storing them in the fridge or freezer to prevent condensation and sogginess.
Make Ahead Options
Busy home cooks will appreciate how forward-thinking these Beef Taquitos can be! You can assemble the taquitos up to 24 hours in advance by filling and rolling them, then covering them tightly with plastic wrap and refrigerating. This prep ensures flavors meld beautifully while saving you time on a busy night. If you’re looking to make them even further ahead, they can be frozen for up to 4 months; simply freeze them on a baking sheet before transferring to a zip-top bag. To finish, bake them directly from frozen, adding a few extra minutes to the cooking time. By prepping ahead, you’ll find the beef taquitos are just as delicious, allowing for a quick, satisfying dinner whenever you need it!

Beef Taquitos Recipe FAQs
How do I choose the best avocados for my avocado salsa?
Absolutely! When selecting avocados, look for ones that yield slightly when pressed gently; they should not be overly soft or have dark spots all over. A ripe avocado is smooth, and dark green to black in color; avoid any that are too firm or have blemishes.
What’s the best way to store leftover Beef Taquitos?
To keep your leftover beef taquitos crispy, store them in an airtight container in the refrigerator for up to 3 days. I recommend reheating them in the oven at 350°F for about 10-15 minutes to maintain their delicious crunch.
Can I freeze uncooked Beef Taquitos?
Yes, you can absolutely freeze uncooked assembled beef taquitos for up to 4 months! Arrange them on a tray without touching and freeze until solid, then transfer them to a zip-top bag for compact storage. To cook, bake directly from frozen, adjusting the cooking time by a few extra minutes.
What should I do if my taquitos are falling apart while frying or baking?
This can happen if the tortillas are too cold or not warmed long enough. Make sure to warm them in the microwave for about 30 seconds before filling them. Also, apply the flour paste generously on the edges to seal them well; this will help keep them together during cooking.
Can I make Beef Taquitos gluten-free?
Absolutely! You can substitute traditional corn tortillas with gluten-free corn tortillas. Just ensure that all other ingredients, like the taco seasoning and cheese, are also gluten-free. This way, everyone can enjoy the savory goodness without worry.
Is there a good way to reheat frozen Beef Taquitos?
Definitely! To reheat frozen beef taquitos, preheat your oven to 375°F. Place the frozen taquitos on a baking sheet and bake for about 20-25 minutes until heated through and crispy. You can spritz them lightly with oil to enhance crispiness if desired.

Beef Taquitos That'll Make You Ditch Takeout Tonight
Ingredients
Equipment
Method
- Heat neutral oil in a skillet over medium heat. Add chopped onion and jalapeños, sauté for about 5 minutes.
- Add garlic and tomato paste, cooking until caramelized for 3-4 minutes.
- Incorporate ground beef, taco seasoning, and salt; cook until browned, about 6-8 minutes.
- Cool the mixture while preparing tortillas.
- Mix cheddar and pepper jack in a bowl. Prepare flour paste with lime juice.
- Warm tortillas in the microwave for 30 seconds. Fill each with beef mixture and cheese, roll tightly sealing with flour paste.
- Preheat oven to 400°F or heat oil for frying. Arrange taquitos seam-side down on a baking sheet if baking.
- Bake for 15-20 minutes or fry for 5 minutes until golden brown. Drain on paper towels if fried.
- Serve taquitos garnished with cilantro and chilled crema, alongside guacamole and pico de gallo.
Leave a Reply